Quick Start Guide
Welcome to PrepStation! This guide will help you get oriented with the application in about 5 minutes. We'll walk through the dashboard and navigation so you can confidently explore the rest of PrepStation.
What You'll Learn
By the end of this guide, you'll know how to:
- Navigate the dashboard - Understand the visual flow of your kitchen data
- Use the flow diagram - Find your way around the multi-page dashboard
- Use Quick Navigation - Master the section navigator on detail pages
- Get started creating - Jump into recipes and ingredients
Don't worry if you make mistakes along the way—nearly everything in PrepStation can be edited or undone.
The Dashboard: Your Kitchen at a Glance
After logging in, you'll land on your Dashboard. This is your home base—a visual map of how data flows through PrepStation.
Watch the overview:
Understanding the Flow Diagram
The dashboard displays your kitchen operations as an interactive flow diagram. Each card represents a major area of PrepStation, and the lines connecting them show how data flows between areas:
Vendors → Ingredients → Recipes → Menu Items → Meal Plans
Dashboard Cards
Each card on the dashboard:
- Links directly to that section when clicked
- Shows a + button to create a new item
- Displays key statistics for your data (counts, costs, etc.)
- Highlights connections when you hover—showing related cards
See how hover highlighting works:
Tip: Hover over any card to see which other cards it connects to. The lines light up to show the data relationship.
Multi-Page Layout
The dashboard is organized across three pages to keep things manageable:
| Page | What's There |
|---|---|
| Page 1 | Core items: Ingredients, Recipes, AI Chat, Cost Insights |
| Page 2 | Menu & Production: Menu Items, Menus, Meal Plans, Production |
| Page 3 | Supply Chain: Vendors, Inventory, Invoices, Purchase Orders |
Use the page indicators at the top of the dashboard to switch between pages. Each page focuses on a different aspect of your operations.
Watch how page switching works:
Customizing Your Dashboard
You can personalize the dashboard layout:
- Click the Edit button (pencil icon) in the dashboard header
- Drag groups to reposition them where you prefer
- Your layout is saved automatically
Note: Your customized layout is saved to your account, so it follows you across devices.
Quick Navigation: Mastering Detail Pages
When you open an ingredient, recipe, or other detail page, you'll see the Quick Navigation panel at the top. This is your guide through all the sections available on that page.
Watch Quick Navigation in action:
How Quick Navigation Works
The Quick Nav displays circular buttons arranged in a snake pattern—rows alternate direction to create a natural flow:
[Details] → [Vendors] → [Units]
                              ↓
[History] ← [Alternatives] ← [Prep]
The progress line shows your path through the sections. As you select different sections, the line animates to show where you are.

Navigating Sections
Click any nav button to jump to that section:
- The active section scales up and highlights
- Other sections dim slightly to focus attention
- Content smoothly transitions below
Keyboard shortcuts:
- Arrow keys (← → ↑ ↓) to move between nav items
- Enter or Space to select
Visual Indicators
Quick Nav buttons show helpful status information:
| Indicator | Meaning |
|---|---|
| Green ring | Section is complete or ready |
| Yellow ring | Section needs attention |
| Red ring | Issues that need resolving |
| Fill percentage | Progress through that section |
| Badge | Alerts or notifications |
For example, on an ingredient page:
- A green ring on Vendors means you have vendor pricing set
- A yellow ring on Allergens means allergens haven't been configured yet
Action Buttons
Some nav items have action buttons that appear when selected:
- Click a nav item to select it
- Action buttons appear next to the nav item
- Click an action to perform it without leaving the section
Common actions include Quick Add, Edit, Export, and more.
See action buttons on a recipe page:
Side Panels
On larger screens, some sections open in a side panel instead of replacing the main content:
- The side panel slides in from the right
- Main content shrinks to make room
- Click the same nav item again to close the side panel
This lets you reference one section while working in another.
Getting Started Creating
Now that you understand navigation, here's where to start building your kitchen data:
Start with Ingredients
Ingredients are the foundation. You'll need them before creating recipes.
- From the dashboard, hover over the Ingredients card
- Click the + button that appears
- Enter a name and basic details
- Click Save
Tip: You can add vendor pricing later—ingredients work for recipe building even without costs.
Then Create Recipes
Once you have some ingredients:
- From the dashboard, hover over the Recipes card
- Click the + button that appears
- Enter a recipe name
- Use Quick Add Ingredient to add ingredients in natural language
The Recipe Editor
Once you create a recipe, you'll land in the Recipe Editor—your workspace for building complete recipes. The editor shows:
- Navigation Dashboard at the top (Recipe, Details, Cost Analysis, etc.)
- Ingredients panel on the left
- Instructions panel on the right
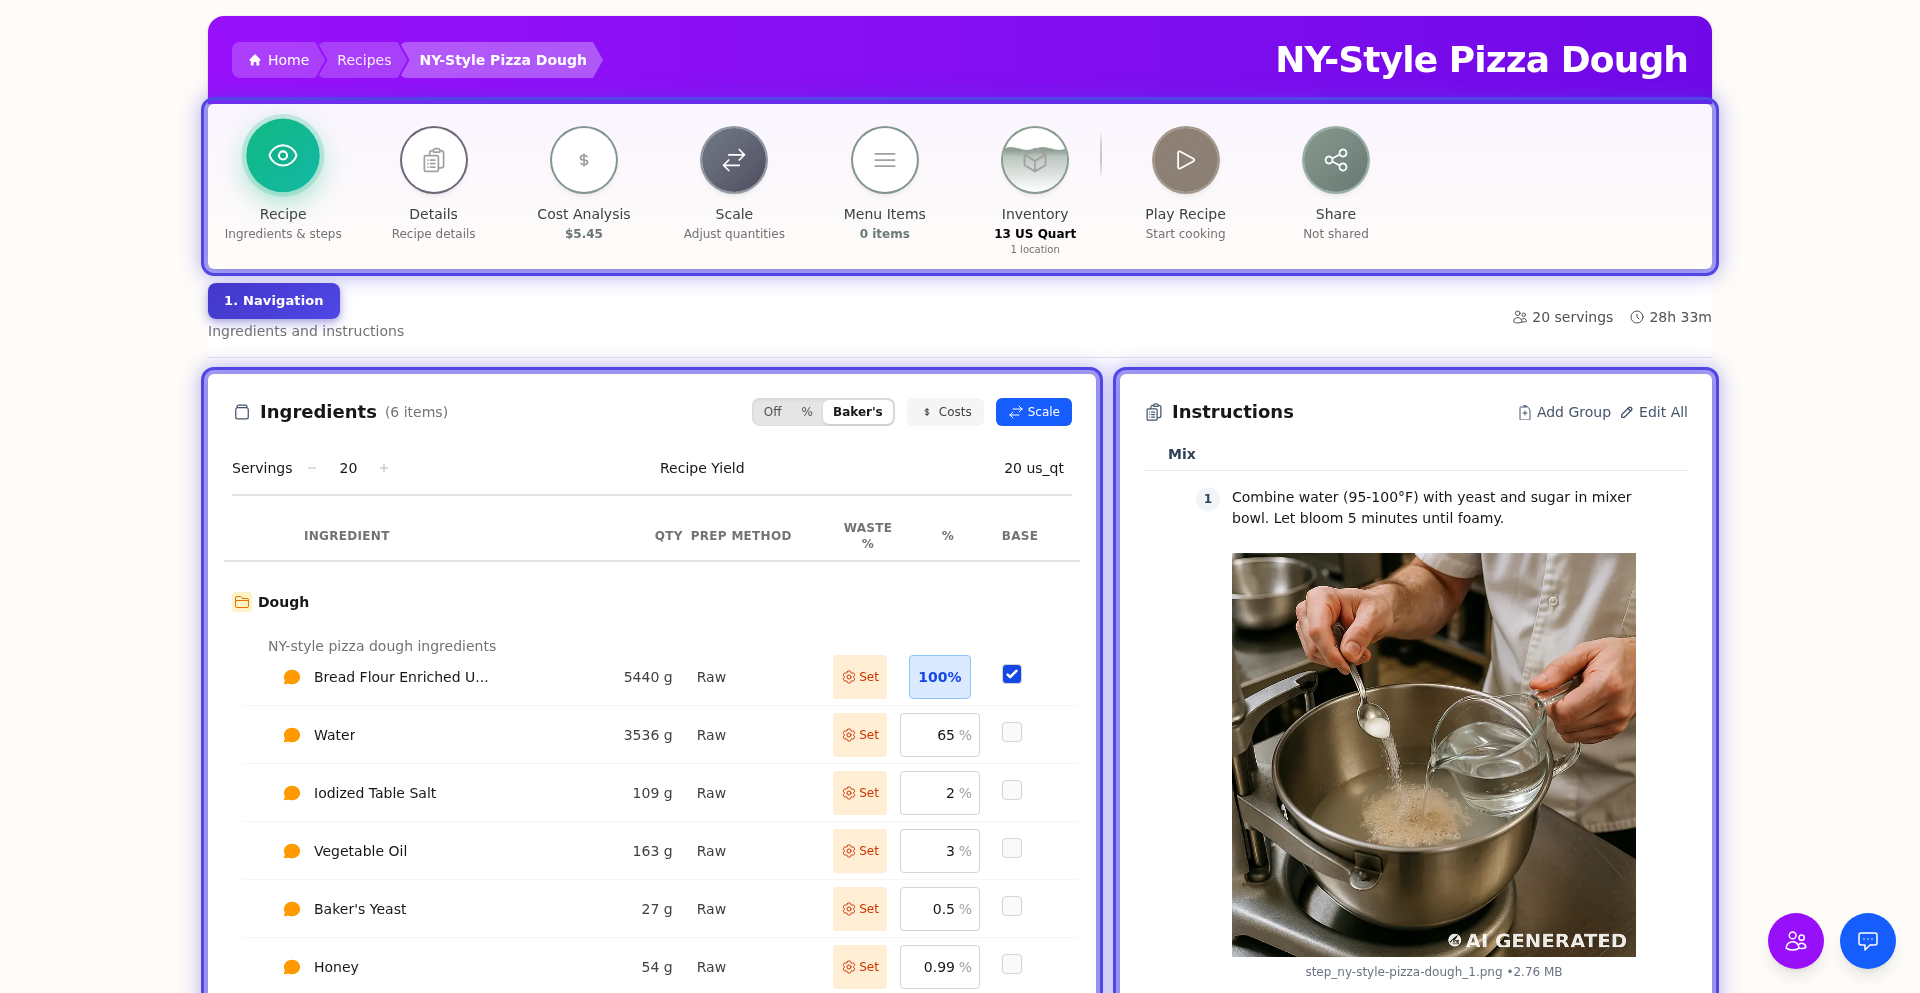
Add Ingredients
The fastest way to add ingredients is Quick Add. Click the nav item for Recipe, then click Quick Add Ingredient:
Type or paste your ingredients in natural language:
2 cups all-purpose flour
1 tsp salt
3 eggs
1/2 cup milk, room temperature
PrepStation parses quantities, units, and prep notes automatically, then matches them to your ingredient database.
Tip: If an ingredient isn't in your database yet, PrepStation will let you create it on the fly.
Add Instructions (Optional)
Click the + Add instruction row in the instructions panel to add cooking steps:
- Type your instruction
- Press Enter or click away to save
- Repeat for each step
Instructions can be organized into groups (like "Prep", "Cooking", "Assembly") using the Add Group button.
Understanding Your Costs
Once you have ingredients with vendor pricing, use the Quick Nav to click Cost Analysis and see your recipe costs.
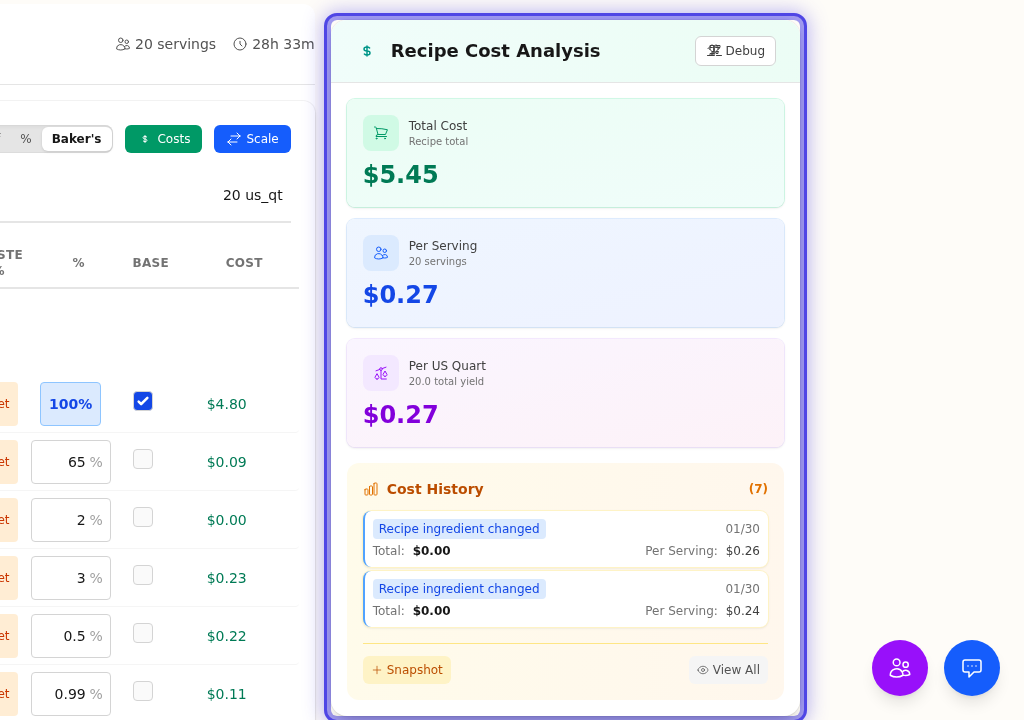
What Each Number Means
| Metric | What It Tells You |
|---|---|
| Total Recipe Cost | Cost to make the entire batch |
| Cost Per Serving | Total cost ÷ number of servings |
| Unit Cost | Total cost ÷ yield quantity (if yield is set) |
Costs Update Automatically
Your costs recalculate whenever you:
- Add, remove, or change ingredient quantities
- Update vendor pricing
- Adjust servings or yield
Missing costs? Check that your ingredients have vendor pricing set. PrepStation shows a warning icon next to any ingredient that's missing cost data.
What's Next?
You now understand how to navigate PrepStation. Here's where to go from here:
Build Your Database
- Managing Ingredients - Add ingredients with full details
- Import Ingredients - Bulk import from spreadsheets
- Add Vendors - Track costs from different suppliers
Create Recipes
- Creating Recipes - Complete recipe guide
- Prep Recipes - Create reusable components (sauces, stocks, doughs)
- Recipe Scaling - Scale recipes up or down accurately
Organize Your Kitchen
- Build Menus - Create menus with cost analysis (Page 2 on dashboard)
- Track Inventory - Know what's on hand (Page 3 on dashboard)
- Plan Meals - Schedule across days and weeks
Quick Reference
Keyboard Shortcuts
| Shortcut | Action |
|---|---|
Arrow keys |
Navigate Quick Nav items |
Enter / Space |
Select Quick Nav section |
Tab |
Move between fields |
Enter |
Save current item |
Escape |
Close dialogs or side panels |
Dashboard Tips
| Action | How |
|---|---|
| Create new item | Click + button on any card |
| See connections | Hover over a card |
| Switch pages | Click page indicators at top |
| Rearrange layout | Click Edit, then drag groups |
Getting Help
- AI Assistant - Click the chat icon on Page 1 of the dashboard to ask questions in natural language
- Documentation - Browse these guides for detailed walkthroughs
- Onboarding Tours - Look for the tour guide on new pages
Common Questions
Q: How do I get back to the dashboard?
A: Click the PrepStation logo in the top navigation, or click Dashboard in the main menu.
Q: The dashboard looks different than I expected. Where is everything?
A: The dashboard has three pages. Use the page indicators at the top to switch between them. Page 1 has core items (Ingredients, Recipes), Page 2 has menus and production, and Page 3 has supply chain items.
Q: How do I reset my dashboard layout?
A: Click the Edit button (pencil icon), then click Reset Layout to restore the default arrangement.
Q: What do the colored rings on Quick Nav mean?
A: Green indicates complete/ready sections, yellow means needs attention, and red indicates issues to resolve. These help you quickly see where you need to focus.
Q: Can I reorder sections in Quick Nav?
A: On some pages, yes. Look for a drag handle on nav items—if present, you can drag to reorder.
Q: I added an ingredient but costs aren't showing.
A: Ingredients need vendor pricing for cost calculations. Use Quick Nav to go to the Vendors section on your ingredient page and add a vendor cost.
Q: Can I undo my changes?
A: Most changes can be reversed by editing. Deleted items go to an archive where they can be restored. Only "Permanent Delete" removes items forever—and you'll always see a warning first.
Ready to dive deeper? Continue to Creating Recipes for the complete guide.
Last updated: July 11, 2026